In a previous post, you learned how to publish your static website using Next.js with the help of GitHub Pages. Now, let's explore how to use a custom domain for a website hosted on GitHub Pages, instead of the default myusername.github.io domain. This guide will walk you through the steps to set up your custom domain. Let's get started!
Purchase a Custom Domain Name
First, ensure you have purchased a custom domain name. If you haven't, you can obtain one from a domain registration service of your choice. I personally use Cloudflare for its many additional features and highly recommend it. However, feel free to choose any service that suits your needs.
Verify Your Domain Name
Verifying your domain name is crucial to prevent unauthorized parties from using your domain for their own purposes. This process can be done through the Pages menu under Settings in your GitHub profile. For more detailed information, refer to the official GitHub documentation.
Here is an example of my domain names as defined on GitHub:

Set Up DNS on Your Domain Registration Service Provider
To connect your domain to your GitHub Pages website, you need to set up DNS records with your domain registration service provider. While the process is similar across different providers, I'll guide you through the setup on Cloudflare.
Step 1: Configure A and AAAA Records
-
A Record: Create or modify an A type record using the 'Add record' button. Set the Name field to
@to represent the root or enter your domain name without thewwwprefix. In the Content field, enter192.0.2.1and save the settings.Here's my configuration:

-
AAAA Record: Create or modify an AAAA type record using the 'Add record' button. As with the A record, set the Name field to
@or your domain name without thewwwprefix. In the Content field, enter100::and save the settings.My configuration:

Step 2: Set Up CNAME Record
Next, add a CNAME record for the www prefix. If you already have one, edit it; otherwise, create a new record. Set the Name field to www and enter your GitHub Pages domain as the Target.
Here's my configuration:

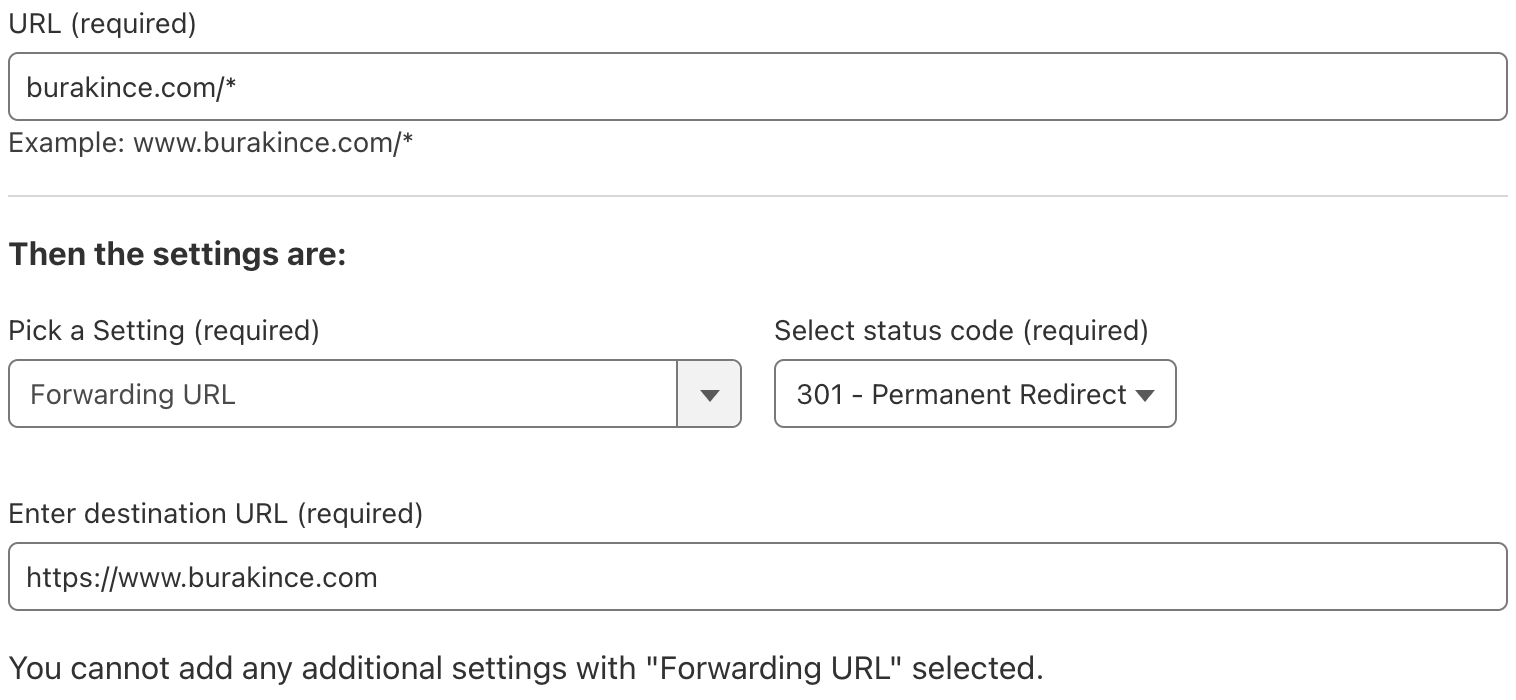
Step 3: Configure Page Rules
Finally, set up a page rule to redirect non-www traffic to the www version with HTTPS:
- Go to the Rules menu and select Page Rules.
- Create a new page rule with your domain name ending in
/*without thewwwprefix. - Set the rule to forward to the
wwwversion of your domain with HTTPS. - Save and deploy the page rule.
Here's my configuration:
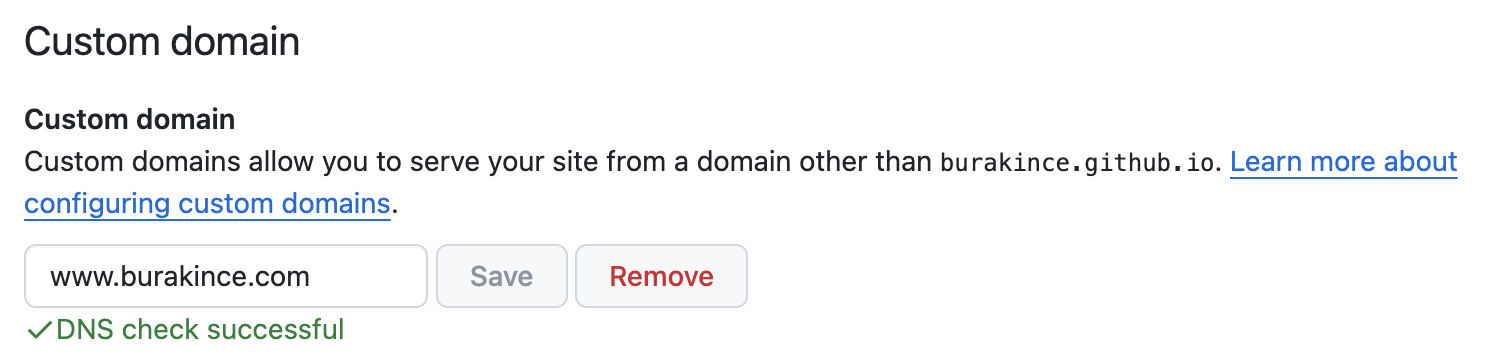
Add a CNAME File to Your GitHub Repository
Create a file named CNAME in your GitHub repository, with your custom domain name as the content. For instance, you can use the following command, replacing my domain name with yours:
echo "www.burakince.com" > CNAME
After committing the file and pushing it to your repository, open the Settings section of your GitHub repository. In the Pages settings, add your custom domain name with the www prefix and save the changes. For more detailed information, refer to the official GitHub documentation.
Here's my configuration:
Your GitHub Pages website should now be accessible via your custom domain name. I hope you found this guide helpful. Let me know if you have any further questions or need assistance!